17 レシピ
| grandMA3 クイックスタートガイド » 17 レシピ | Version 2.2 |
15章では、種々のプリセットを用いて複数キューを持つシーケンスを作成しました。
レシピでも同様の結果が得られますが、非常に柔軟な設定になります。これは、フィクスチャの数や種類が将来変更される可能性があること想定し、それに備えてショーをプログラムできることを意味します。
レシピの仕組みについて見ていきましょう。
レシピ行には一連の情報を含めることができます。これには、多くの場合、フィクスチャ・セレクション(おそらくグループから)、値のセット(多くの場合プリセットから)、および値をフィクスチャに適用する方法についての情報が含まれています。この情報が、キューや新しいプリセットに「クック(cook)」されます。
要素が変更された場合、レシピを再クックすることで、更新された情報をキューやプリセットに反映されることができます。セレクションに値を適用する方法に関する情報を含む要素は、(第13章で行ったように)すべてのプリセットを埋め込み(Embedded)プリセットで用いる場合に比べて、レシピをユニークなものにしています。また、いくつかのグループを更新してからシーケンス全体を再度クックできる柔軟性により、例えばツアーなどでショーのセットアップを頻繁に調整しなければならない場合に、レシピは非常に柔軟で優れたツールとなります。
レシピには複数のレシピ行を含めることができます。各行は1セットの情報を持てるため、レシピ全体では複数の情報セット持つことができます。
この図は、「レシピ」トピックからのものです。


これは、レシピをキューパートやプリセットに保存し、それをキューパートで利用できることを示しています。"MAtricks" という要素もありますが、これについてはクイックスタートガイドの範囲を超えるため説明しません。
If a cue part contains its own recipes and uses presets with recipes, then it can be a complex calculation for the software to figure out what output the fixture should have. Ultimately, each fixture can only have output from one source at any given time.
したがって、できるだけシンプルにすることをお勧めします。どんなに複雑なプログラムを作成してもソフトウェアはそれを理解してくれますが、自分自身や同僚を混乱させるリスクが大きくなります。
では、実際にレシピを作成して、その機能を見てみましょう。
ビューの設定
まず、使用する要素を含むビューを設定しましょう。
シーケンスを確認するには Sequence Sheet が必要です。空のユーザ定義エリアに Sequence Sheet を作成するか、Sequence Sheet を含むビューを呼び出してください。
空のプール・オブジェクトを持つ Group プール、そして All 1 プリセットプールも必要です。3D Viewer を表示しておくと役立つ場合もあります。
We need to make sure the sequence sheet displays the recipe lines. It might show this by default, but to ensure it does, click the MA logo in the upper left corner of the sheet, then click the Mask tab. This tab has settings for adjusting how the sequence sheet looks. Click Show Recipes to toggle it On. This setting might also have a button in the title bar called 'Show Recipe'. This toggles the same setting as the one in 'Mask'.

設定を閉じてください。
これで、Sequence Sheet の下部に、レシピを作成・編集できる領域が表示されます。
レシピ付きキュー
We are going to create a cue that uses a recipe.
Start by clearing the programmer and turn off any active sequence.
Then, store a new sequence and select it. For me, it is going to be sequence number 6.
The new sequence should contain an empty cue 1. You can assign an executor to control the sequence if you want.
We are going to create a recipe that uses a group. Select fixtures 201 and 202 and store this as a new group. This is going to be my group number 17.
We now have all the building blocks we need for our cue recipe.
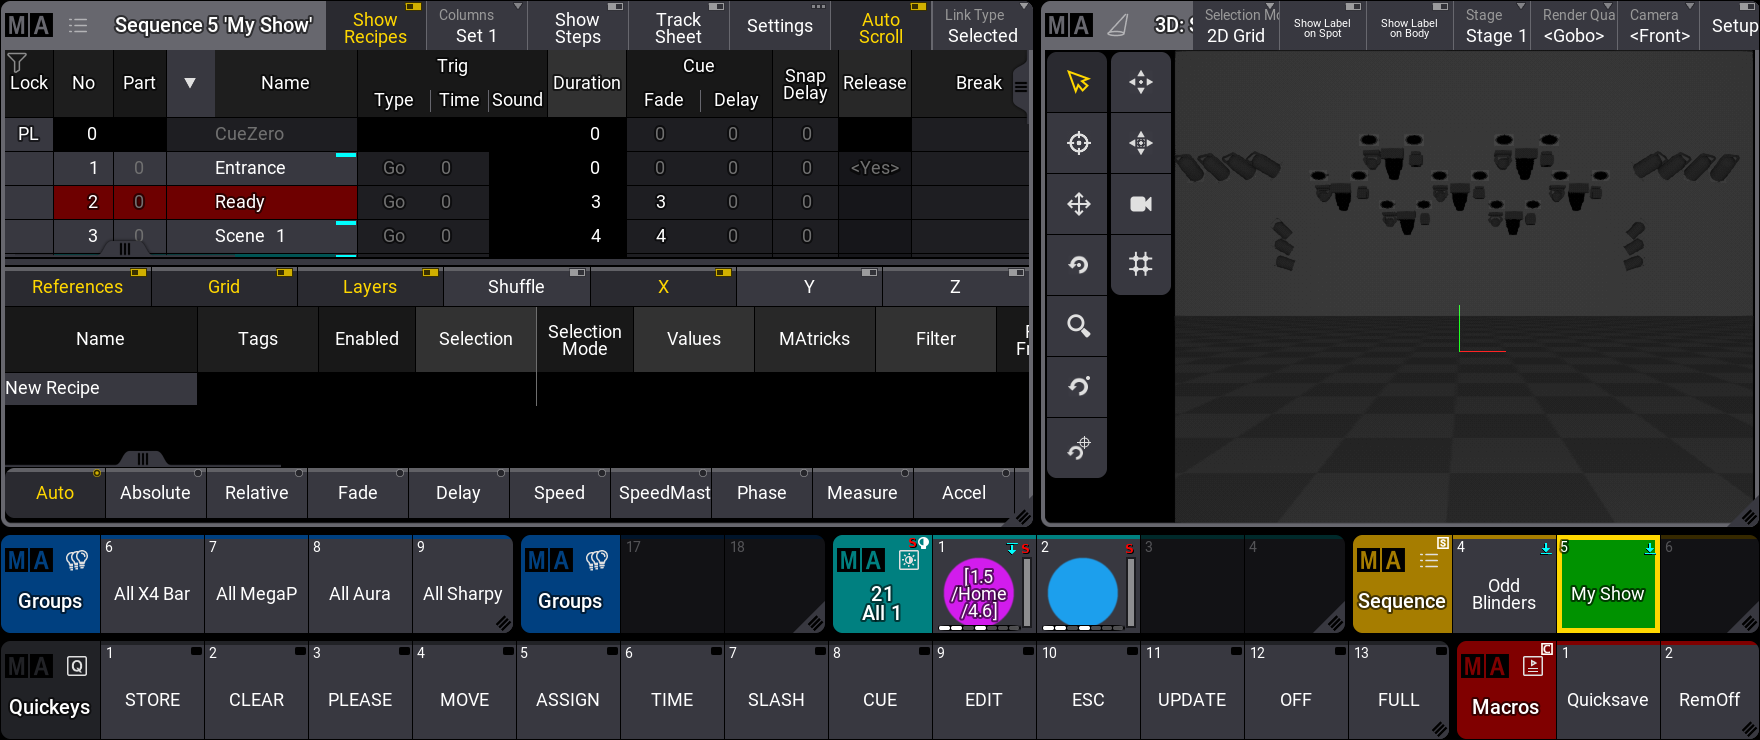
You can see the recipe area at the bottom of the sequence sheet. Click cue 1 to select it - you might need to click the cue part number.
The separation between the normal sequence sheet and the recipe area can be adjusted by clicking and moving the gray bar, separating the two areas up or down.
Right-click New Recipe in the recipe area to create a recipe line.
This line has a lot of columns that can contain settings for the recipe line. It is outside the scope of this quick start guide to explain what each column does.
Right-click (or Edit) the field in the "Selection" column. This opens a selection pop-up with all the groups. Select the new group with the two Mega Pointes. Now right-click the "Values" field and select a color preset.
Now we can see the cue name changed, and it got a small "pot" (![]() ) icon.
) icon.
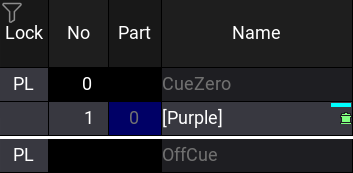
Run the first cue of the sequence. We don't see anything. Select the group and give the fixtures a dimmer value. Store this into cue 1 using merge and clear the programmer.
We can see that the fixtures get the color from the preset cooked into the cue, and the dimmer values are stored directly into the cue without referencing a preset or a recipe. Turn on Track Sheet to see what is stored in the cue. It appears that the color is just coming from the preset, just like if we stored it manually into the cue. Only the small green dot in the upper right corner of the value and the pot icon in the name indicates that some attributes are affected by a recipe.
You should have some dimmer presets, including one with a low level and one with 100%. If you do not, then please create these (as universal presets).
Let us create a new recipe line for cue 1, so we have two lines. We also want the group to be the "selection" for this line. Use the swipey menu of the group and select Assign. Now click the new recipe line. This assigns the group as the selection.
Use any of the two methods to select a dimmer preset with a lower dimmer value as the "value".

Notice that this does not change the output. This is because the cue's manually stored "hard" values have a higher priority than the recipe data.
The second line's name is red, and the pot icon in the cues' name is red. This indicates that some recipe values are not cooked.
Let us try to change the fixture selection in the group. Select group 7 and store the new selection into the group used in the recipe - in my example, group 17. You can choose to merge or overwrite the group.
The result is that the other spots turn on in my selected color and the lower dimmer value - they reference both the dimmer and color preset. The pot icon turned green again.
We will now remove the stored "hard" dimmer values from the cue.
With the group selection, give the fixtures a dimmer value - the actual value does not matter; we just need the active programmer value.
Execute the following command:
|
|
User name[Fixture]>Store Cue 1 /Remove |
Clear the programmer. All the dimmer values are now removed from the cue, and the fixtures turn off. Even when we still have dimmer values in the recipe, we can remove the cooked data from the cue. If we want the dimmer values from the recipe back in the cue, then we can edit the recipe, which will trigger an auto-cook, or we can manually cook the cue or sequence again.
Let us try the manual approach. Execute the following command:
|
|
User name[Fixture]>Cook Sequence 6 |
If your sequence is not number 6, please adjust the number to match.
This gives us a pop-up:
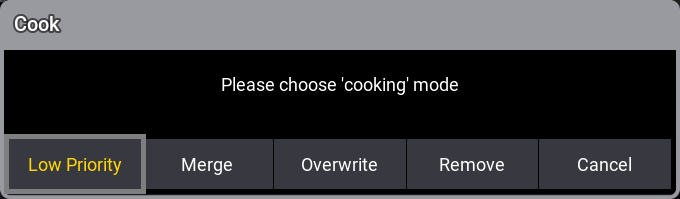
We did not specify how the values should be cooked into the cue in our command, so the software asks us what we want. Notice that we can also use the cook command to remove recipe data.
We want to merge the recipe data, so click Merge.
The fixture now uses the dimmer preset.
Let us try to change the dimmer preset in the second recipe line. Select a different dimmer preset with a high output. You can use the assign method or right-click the values field in the line and select the desired preset. Notice how the cue name adjusts to represent the referenced presets.
Add a third recipe line and use the same group as the selection and a position preset as the value.
When the value and selection are added, it is automatically cooked into the cue, and the fixtures reflect the output.
The final change we will make is adjusting the fade and delay times for the dimmer recipe line.
Scroll the recipe to the right to show the four "Fade" and "Delay" columns.
There is a "From X" and "To X" for both fade and delay. It is outside the scope to explain the X, but the from and to allow us to add a value range for the selection. Give the "Fade From X" field a value of 3. The "Fade To X" a value of 10. The "Delay From X" should be 1.
The result should look like this (the presets can be different):

Try to turn off the sequence and then run the cue. You can see that the individual fixtures use the individual fade times matching the range in the recipe. It might be easier to see in a fixture sheet.
Finally, edit the group (Group 17) to contain only fixtures 201 and 202 and use the "overwrite" method to store only these two fixtures in the group.
The output is now updated. If not, try turning off the sequence and run the cue again to see how the output adjusts to the new selection.
Preset Recipe
We are going to create a preset containing a recipe.
Clear the programmer and turn off the sequence.
We are going to adjust the view to include the "Recipe Editor" window, the color preset pool, and the dimmer preset pool. My view looks like this:
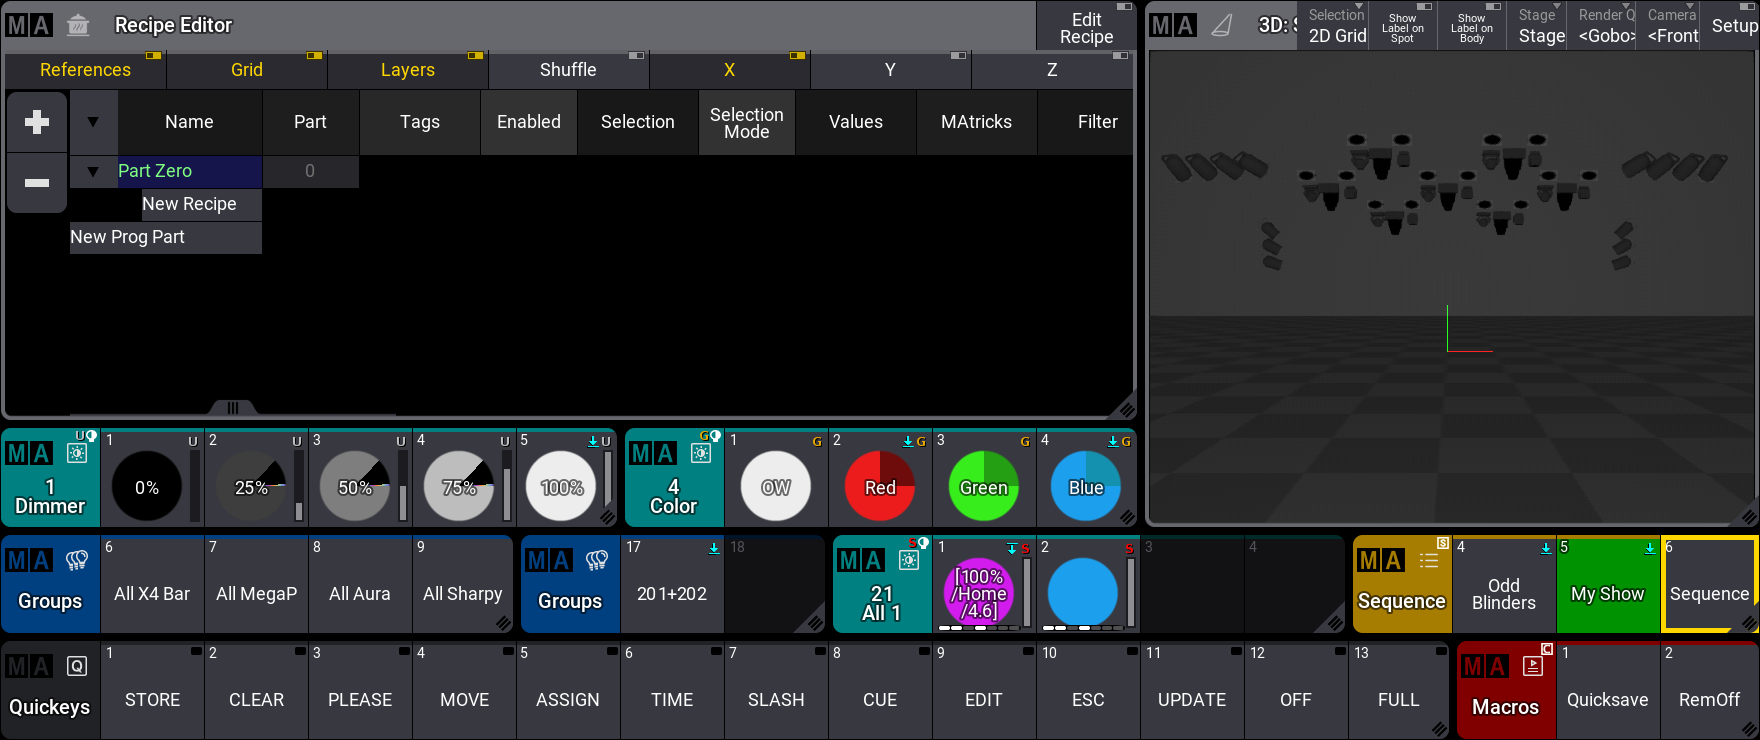
The Recipe Editor is a window we can use to build and edit a recipe in the programmer. We will use this to create a new recipe and store it in a new preset.
Click the Edit Recipe button in the title bar of the window to turn On the edit mode.
Notice that this adds a green recipe pot icon in the title fields of the presets and groups pools. Also, the 'Edit' and 'Esc' keys flash to indicate the edit mode.
Now, we can build a recipe by clicking relevant pool objects.
Click the group with the two fixtures (my group 17) and then the high output dimmer preset. They both get a green frame, and the recipe line is added to the editor.
Click one of the color presets and one of the dimmer presets.
Now, we have three recipe lines and four pool objects with a green frame.
Two of these are dimmer presets. Both try to send a dimmer value to the same group, but only one of the recipe lines can be used. It is the line we clicked last that will be used.
We could save this, but we could only clean it up a bit. Click CleanUp in the title bar. This removes the unnecessary recipe line.
My result looks like this:

These are programmer values, and they can be stored in a cue or a preset. Store this as a new "All 1" preset. My first available preset is number 3.
The preset is created, and the active programmer values are removed. The group is still selected, and the edit mode is still active, so the group has a green frame.
Clear the programmer and click Edit Recipe to turn it Off.
Now, try the preset by clicking it twice. The fixture should turn on in the selected color. Let us try to adjust the preset.
Right-click the preset. The recipe lines are called back into the Recipe Editor, and the editor has a green frame to indicate the general edit mode - not the "Edit Recipe" mode.
We will add a "Fade From X" value of 2. Find the correct column and edit the value to 2.

Click Update and update the preset. Clear the programmer and try clicking the preset twice to test the change. The color should fade in.
Click the group with all the Mega Pointe (group 7) and store (merge) the selection into the group used in the recipe (my group 17).
This does not update the output. The programmer still only has the recipe information for the two fixtures. The added fixtures are not automatically cooked into our programmer. Click the preset to call the recipe values for the entire group.
Recipe Preset without a Selection
We will now create a recipe preset that does not contain a selection. A preset without a selection can be applied to the current selection. The valid values are then cooked into the programmer.
Use the swipey menu on an empty preset in the All 1 preset pool. For me, the first empty pool object is number 4. In the swipey menu, select Edit Settings. This opens an editor for the pool object.
This is a big editor that uses a lot of space. We can get a bit more space for our needs if we turn off the 'Settings' in the title bar.
![]()
This big editor has the same recipe section as the Recipe Editor, plus a big MAtricks section at the bottom. Before we can add a recipe line, we need to click Turn into Recipe at the bottom of the editor.
This gives us the first recipe line where we can assign a "value". Please select a color preset as the value.
In the MAtrick section below the recipe lines, please edit the "XWings" to a value of 2 and the "Fade From X" columns to 3, the "Delay From X" to 0 and "Delay To X" to 5.
Add an extra recipe line and a dimmer preset with a high value for the recipe line.
The result should look something like this:

Notice the MAtricks part changes to show the settings for the selected line.
Close the editor.
Ensure the programmer is empty. Select the group with all the Auras and then click the new preset.
This calls the preset into the programmer using the fade and delay times and the recipe values. The programmer content does not refer to the recipe preset but to the content of the recipe preset. This can be seen in the Fixture Sheet.
A preset like this can be used to busk and play back values on the fly or to build other presets.
Clear the programmer.
Add Recipe Preset to the Sequence
Click the first preset we created twice.
Store this as cue number 2 in our recipe sequence.
Clear the programmer and run the two cues. It seems to work. The fixtures do what we wanted.
Turn off the sequence again.
Select fixtures 201 and 202 and store (Overwrite) the selection in the recipe group (Group 17).
Run the two cues again.
Cue 1 looks as expected, but cue 2 still affects all the fixtures. Clicking the preset twice confirms that the preset actually updated to use the new group.
The problem with cue 2 is that the link to the preset was never updated to the new group content. The cue does not know that the recipe preset was changed to a smaller selection.
Let us fix the problem and simply add a recipe for the second cue.
The second cues recipe line should have our recipe group (Group 17) as the selection and the All preset as the "values".
Now we need to cook the sequence using the following command:
|
|
User name[Fixture]>Cook Sequence 6 /Overwrite |
If your sequence is not number 6, please adjust the number to match.
Overwrite can be a very dangerous function, but in this case, it makes a lot of sense to use it because we only want the cues to contain the recipe content.
Turn Off the sequence, clear the programmer, and try running the two cues again.
Now, the cues look as expected.
You can continue to play around with recipes if you want to explore further.
Remember to store your show when you are done.
要約
この最終章は長くなりましたが、レシピは話題は広範囲にわたり、ここでは表面をなぞっただけに過ぎません。
レシピにはさらに多くの詳細がありますが、柔軟性が必要とされるショーでレシピを用いる利点の一端を知っていただければと思います。
レシピについては、レシピ で詳しく説明されています。キューにおけるレシピの使用については、キュー・レシピ で述べられています。また、プリセットでの使用については、レシピ・プリセット を参照してください。
最後に
これでクイックスタートガイドは終了です。お読みいただきありがとうございます。楽しく学んでいただけたでしょうか。
このガイドでは、最高度のショーを作成したわけではありません。目標は、ソフトウェアが持つ多く機能のいくつかを紹介することでした。
ユーザマニュアルは、grandMA3 に関する詳細情報を得るための優れたリソースです。また、リリースノートで最新の変更点を把握できます。
さらに学びたい場合は、オンライン学習も用意されていますので、MA Lightings Webサイト をご覧ください。
他のユーザや専門家から助けを得られる Official Forum もあります。
またオンライン上には、grandMA3 に関する優れた洞察や情報を提供する、公式・非公式のさまざまな動画があります。
Happy Programming